|
|
||||||||||||||||||||||||||
Sigma Projection |
||||||||||||||||||||||||||
ESP8266 WiFi Module - Practical TipsOverviewThis section presents some practical examples in respect of how ESP8266 SDK can be setup and how ESP applications can be built using C language in Eclipse IDE. One of the main aims of this material to show how to create and build applications for ESP8266 module without using heavy Arduino framework. This solution is built using standard native ESP SDK and ESP Open SDK toolchain. Youtube VideoIn this video you can find step-by-step instructions how to setup Eclipse working environment and how to build ESP applications using C language.
Step-by-step instructionsA. ESP8266 as USB device detection. Serial port setup.Once you have ESP device connected via USB-to-Serial adapter, it is possible to check its availability using lsusb SH command. At the output you have to notice VendorID and ModelID of your ESP module.
lsusb
Bus 001 Device 002: ID 8087:8000 Intel Corp.
Bus 001 Device 001: ID 1d6b:0002 Linux Foundation 2.0 root hub
Bus 003 Device 002: ID 2109:0812 VIA Labs, Inc. VL812 Hub
Bus 003 Device 001: ID 1d6b:0003 Linux Foundation 3.0 root hub
Bus 002 Device 007: ID 13d3:3414 IMC Networks
Bus 002 Device 005: ID 0bda:57b4 Realtek Semiconductor Corp.
Bus 002 Device 003: ID 046d:0825 Logitech, Inc. Webcam C270
Bus 002 Device 008: ID 046d:c077 Logitech, Inc. M105 Optical Mouse
Bus 002 Device 006: ID 046d:c31c Logitech, Inc. Keyboard K120
Bus 002 Device 004: ID 05e3:0606 Genesys Logic, Inc. USB 2.0 Hub / D-Link DUB-H4 USB 2.0 Hub
Bus 002 Device 010: ID 1a86:7523 QinHeng Electronics HL-340 USB-Serial adapter
Bus 002 Device 002: ID 2109:2812 VIA Labs, Inc. VL812 Hub
Bus 002 Device 001: ID 1d6b:0002 Linux Foundation 2.0 root hub
Detected device most probably will have restricted access rights which will not allow you to write to the port.
ls -la /dev/ttyUSB0
crw-rw---- 1 root dialout 4, 64 Nov 24 20:48 /dev/ttyUSB0
To update port access rights and to create handy symbolic link you can define custom UDev rule for ESP module. In Debian Linux this can be specified at /etc/udev/rules.d/61-esp8266-serial.rules using the following template:
KERNEL=="ttyUSB[0-9]", ENV{ID_VENDOR_ID}=="1a86", ENV{ID_MODEL_ID}=="7523", GROUP="plugdev", SYMLINK+="serial/esp8266"
Where your VendorID and ModelID should be specified accordingly (instead of 1a86 and 7523 values). You can reboot system once configured, and proper symbolic link will be created and assigned to plugdev group:
ls -la /dev/ttyUSB0
crw-rw---- 1 root plugdev 188, 0 Nov 24 20:48 /dev/ttyUSB0
ls -la /dev/serial/esp8266
lrwxrwxrwx 1 root root 10 Nov 24 20:48 /dev/serial/esp8266 -> ../ttyUSB0
B. ESP native SDK installation.It is possible to pick-up quite extensive number of different SDKs from official ESP GitHub page: ESP8266 NONOS SDK 3.0.5. In our sample we will follow the simplified version of NON-OS SDK V3.0.5. Once archive with sources will be downloaded it can be extracted at some folder (e.g. ~/esp8266-dev-kits/esp-native-sdk/). C. ESP Flash Tool setup. Sample ShellScript to flash application to chip. Compatible with Debian 10 Buster (or earlier).ESP Flash Tool is supplied as a separate Python Pip module. At the first point you have to make sure that Python and Python Pip are installed on your machine, where Pip can be installed using apt-get. Once pip is installed, you can use it to install esptool. After esptool installation you have to note the location of esptool.py script. Please refer the following steps:
sudo apt-get install python-pip
[...]

pip install esptool
[...]

find ~/.local -name esptool.py
/home/user/.local/bin/esptool.py
/home/user/.local/lib/python2.7/site-packages/esptool.py
Then you can use sample shell-script below which will flash compiled binaries into ESP chip. This template can be customized by adjusting the following arguments (param values are highlighted in green):
PORT=/dev/serial/esp8266
PYTHON=/usr/bin/python2.7
ESP_TOOL=~/.local/bin/esptool.py
FW_BIN_DIR=~/esp8266-dev-kits/esp-native-sdk/bin

if [ ! -c $PORT ]; then
  echo "ERROR: No USB tty device found"
  exit 1
else
  echo "INFO: Using USB tty device: $PORT"
fi

echo
echo "INFO: Erasing Flash Memory... "
$PYTHON $ESP_TOOL --port $PORT --baud 57600 erase_flash
if [ $? -eq "0" ]; then
  echo "INFO: Done Erasing"
else
  echo "ERROR: Unable to complete \"Erase Flash Memory\" step"
  exit 1
fi

echo
echo -n "INFO: Flashing Firware... "
$PYTHON $ESP_TOOL --chip esp8266 --port $PORT --baud 57600 write_flash --flash_freq 20m --flash_mode dio --flash_size detect --verify 0x000000 "$FW_BIN_DIR/eagle.flash.bin" 0x010000 "$FW_BIN_DIR/eagle.irom0text.bin" 0x3FB000 "$FW_BIN_DIR/blank.bin" 0x3FC000 "$FW_BIN_DIR/esp_init_data_default_v08.bin" 0x3FE000 "$FW_BIN_DIR/blank.bin"

if [ $? -eq "0" ]; then
  echo "INFO: Done Flashing"
else
  echo "ERROR: Unable to complete \"Flash Memory\" step"
  exit 1
fi
D. ESP open SDK build and installation. Compatible with Debian 10 Buster (or earlier).In order to build ESP binaries there is a need to use special compiler toolchain. This toolchain is supplied by Espressif on a separate VM. You can use it (in this case you have to stick to VM which is supplied by Espressif) either you can follow solution with esp-open-sdk. ESP Open SDK project is available on github: https://github.com/pfalcon/esp-open-sdk. Before compiling the project please make sure all OpenSDK dependencies are pre-installed (as specified on esp-open-sdk github page). So the alternative toolchain from esp-open-sdk can be built using the following steps:
mkdir -p ~/esp8266-dev-kits
cd ~/esp8266-dev-kits
git clone --recursive https://github.com/pfalcon/esp-open-sdk.git
[...]

cd esp-open-sdk
make STANDALONE=n
[...]
You have to specify STANDALONE=n make build parameter because of we will use Open SDK toolchain together with native SDK framework.
WARNING: If you are using BASH version 5.0 or above you might get the following compilation error:
error: could not find bash >= 3.1

More details about this OpenSDK vs Bash 5.0 compatibility issue are explained here:
[ esp-open-sdk uses crosstools-NG that recognizes versions of bash only up to 4.x ]

So, in order to solve this issue:
At the following file ~/esp8266-dev-kits/esp-open-sdk/crosstool-NG/configure.ac, at line 193 need to set :
(this auto-generated config file will appear after the first compilation attempt)

192:       [[_BASH_ver=$($ac_path__BASH --version 2>&1 \
193:                     |$EGREP '^GNU bash, version (3\.[1-9]|4|5|6|7)')
194:          test -n "$_BASH_ver" && ac_cv_path__BASH=$ac_path__BASH ac_path__BASH_found=:]],

This way, Bash version 5.0 will match specified RegExp and build config script will work correctly
WARNING: Expat library version 2.1.0 recently was retired, which can cause failure on crosstool-NG compilation stage:
Retrieving needed toolchain components 'tarballs'

Additional info is available at ~/esp8266-dev-kits/esp-open-sdk/crosstool-NG/build.log :

   [ERROR]  >>  Error happened in: do_expat_get[scripts/build/companion_libs/210-expat.sh@12]
   [ERROR]  >>        called from: do_companion_libs_get[scripts/build/companion_libs.sh@15]
   [ERROR]  >>        called from: main[scripts/crosstool-NG.sh@591]


This might block overall esp-open-sdk toolchain compilation. In order to fix this issue there is a need to upgrade Expat library version from 2.1.0
to 2.7.3. This can be done by updating all references from 2.1.0 to 2.7.3 at ~/esp8266-dev-kits/esp-open-sdk/crosstool-NG/config/companion_libs/expat.in :
(this auto-generated config file will appear after the first compilation attempt)

1:       # expat config file
2:
3:       choice
4:           bool
5:           prompt "expat version"
6:       # Don't remove next line
7:       # CT_INSERT_VERSION_BELOW
8:
9:       config EXPAT_V_2_7_3
10:           bool
11:           prompt "2.7.3"
12:
13:       endchoice
14:
15:       config EXPAT_VERSION
16:           string
17:       # Don't remove next line
18:       # CT_INSERT_VERSION_STRING_BELOW
19:           default "2.7.3" if EXPAT_V_2_7_3


Expat library version 2.7.3 is live and available, so this can be used for esp-open-sdk build.
Please make sure to update expat.in file on a clean git clone version (with prior bash 5.0 issue fix).
WARNING: isl-0.14 library has changed its location. So the following error might appear during compilation stage:
Retrieving needed toolchain components 'tarballs'

Additional info is available at ~/esp8266-dev-kits/esp-open-sdk/crosstool-NG/build.log :

   [ERROR]  >>  Error happened in: do_isl_get[scripts/build/companion_libs/121-isl.sh@16]
   [ERROR]  >>        called from: do_companion_libs_get[scripts/build/companion_libs.sh@15]
   [ERROR]  >>        called from: main[scripts/crosstool-NG.sh@591]


Similar way, as with Expat library issue - there is need to updathe the config. There is a need to clean the build first:

    make clean

And find the relevant file 121-isl.sh with the issue:

    find crosstool-NG -name 121-isl.sh
    crosstool-NG/lib/crosstool-ng-1.22.0-60-g37b07f6f-dirty/scripts/build/companion_libs/121-isl.sh

Then this 121-isl.sh file needs to be modified to change the dowload link from http://isl.gforge.inria.fr to ftp://gcc.gnu.org/pub/gcc/infrastructure within
do_isl_get() method. If you had the issue with Expad library as well then please re-appy previous change on Expat again, as 'make clean' command
can revert this Expat version fix.
These esp-open-sdk crosstool-NG compilation issues are also described at updated ESP8266 SDK Introduction video on LBRY (full revisited video is available on LBRY feed: lbry://@sigmaprj#c/esp8266-sdk#a). Once compiled - you can check whether toolchain executables have become available:
ls -la ~/esp8266-dev-kits/esp-open-sdk/xtensa-lx106-elf/bin
total 123200
drwxr-xr-x 2 user user     4096 May 30 23:27 .
drwxr-xr-x 8 user user     4096 May 30 23:27 ..
-rwxr-xr-x 1 user user    53947 May 30 23:27 esptool.py
-rwxr-xr-x 1 user user  4632352 May 30 23:14 xtensa-lx106-elf-addr2line
-rwxr-xr-x 2 user user  4844424 May 30 23:14 xtensa-lx106-elf-ar
-rwxr-xr-x 2 user user  6971888 May 30 23:14 xtensa-lx106-elf-as
-rwxr-xr-x 2 user user  2537608 May 30 23:24 xtensa-lx106-elf-c++
lrwxrwxrwx 1 user user       20 May 30 23:24 xtensa-lx106-elf-cc -> xtensa-lx106-elf-gcc
-rwxr-xr-x 1 user user  4588080 May 30 23:14 xtensa-lx106-elf-c++filt
-rwxr-xr-x 1 user user  2534384 May 30 23:24 xtensa-lx106-elf-cpp
-rwxr-xr-x 1 user user     2989 May 30 23:07 xtensa-lx106-elf-ct-ng.config
-rwxr-xr-x 1 user user   228024 May 30 23:14 xtensa-lx106-elf-elfedit
-rwxr-xr-x 2 user user  2537608 May 30 23:24 xtensa-lx106-elf-g++
-rwxr-xr-x 2 user user  2519160 May 30 23:24 xtensa-lx106-elf-gcc
-rwxr-xr-x 2 user user  2519160 May 30 23:24 xtensa-lx106-elf-gcc-4.8.5
-rwxr-xr-x 1 user user   143888 May 30 23:24 xtensa-lx106-elf-gcc-ar
-rwxr-xr-x 1 user user   143752 May 30 23:24 xtensa-lx106-elf-gcc-nm
-rwxr-xr-x 1 user user   143768 May 30 23:24 xtensa-lx106-elf-gcc-ranlib
-rwxr-xr-x 1 user user  1567264 May 30 23:24 xtensa-lx106-elf-gcov
-rwxr-xr-x 1 user user 35185992 May 30 23:27 xtensa-lx106-elf-gdb
-rwxr-xr-x 1 user user  5269264 May 30 23:14 xtensa-lx106-elf-gprof
-rwxr-xr-x 4 user user  5988712 May 30 23:14 xtensa-lx106-elf-ld
-rwxr-xr-x 4 user user  5988712 May 30 23:14 xtensa-lx106-elf-ld.bfd
-rwxr-xr-x 2 user user  4668792 May 30 23:14 xtensa-lx106-elf-nm
-rwxr-xr-x 2 user user  5644656 May 30 23:14 xtensa-lx106-elf-objcopy
-rwxr-xr-x 2 user user  6222880 May 30 23:14 xtensa-lx106-elf-objdump
-rwxr-xr-x 2 user user  4844448 May 30 23:14 xtensa-lx106-elf-ranlib
-rwxr-xr-x 1 user user  1408672 May 30 23:14 xtensa-lx106-elf-readelf
-rwxr-xr-x 1 user user  4621376 May 30 23:14 xtensa-lx106-elf-size
-rwxr-xr-x 1 user user  4621240 May 30 23:14 xtensa-lx106-elf-strings
-rwxr-xr-x 2 user user  5644648 May 30 23:14 xtensa-lx106-elf-strip
This location ~/esp8266-dev-kits/esp-open-sdk/xtensa-lx106-elf/bin needs to be included in your PATH environment variable. Once it is done you can check availability of C/C++ ESP compilers in your shell:
xtensa-lx106-elf-g++ --version
xtensa-lx106-elf-g++ (crosstool-NG crosstool-ng-1.22.0-60-g37b07f6f) 4.8.5
Copyright (C) 2015 Free Software Foundation, Inc.
This is free software; see the source for copying conditions.  There is NO
warranty; not even for MERCHANTABILITY or FITNESS FOR A PARTICULAR PURPOSE.
E. Eclipse IDE Setup.To configure Eclipse for ESP applications development please follow Youtube video included above. Sample C-language applications for ESPA. Hello World.
#include "osapi.h"
#include "user_interface.h"

#define UART_BAUD_RATE				19200

#define SYSTEM_PARTITION_RF_CAL_SZ              0x1000
#define SYSTEM_PARTITION_PHY_DATA_SZ            0x1000
#define SYSTEM_PARTITION_SYSTEM_PARAMETER_SZ    0x3000

#define SYSTEM_SPI_SIZE				0x400000

#define SYSTEM_PARTITION_RF_CAL_ADDR            SYSTEM_SPI_SIZE - SYSTEM_PARTITION_SYSTEM_PARAMETER_SZ - SYSTEM_PARTITION_PHY_DATA_SZ - SYSTEM_PARTITION_RF_CAL_SZ
#define SYSTEM_PARTITION_PHY_DATA_ADDR          SYSTEM_SPI_SIZE - SYSTEM_PARTITION_SYSTEM_PARAMETER_SZ - SYSTEM_PARTITION_PHY_DATA_SZ
#define SYSTEM_PARTITION_SYSTEM_PARAMETER_ADDR  SYSTEM_SPI_SIZE - SYSTEM_PARTITION_SYSTEM_PARAMETER_SZ

static os_timer_t start_timer;

static const partition_item_t part_table[] =
{
	{ SYSTEM_PARTITION_RF_CAL,              SYSTEM_PARTITION_RF_CAL_ADDR,           SYSTEM_PARTITION_RF_CAL_SZ              },
	{ SYSTEM_PARTITION_PHY_DATA,            SYSTEM_PARTITION_PHY_DATA_ADDR,         SYSTEM_PARTITION_PHY_DATA_SZ            },
	{ SYSTEM_PARTITION_SYSTEM_PARAMETER,    SYSTEM_PARTITION_SYSTEM_PARAMETER_ADDR, SYSTEM_PARTITION_SYSTEM_PARAMETER_SZ    }
};

void ICACHE_FLASH_ATTR user_pre_init(void)
{
	system_partition_table_regist(part_table, 3, SPI_FLASH_SIZE_MAP);
}

void run_application(void* args)
{
	os_printf("Hello World");
}

void ICACHE_FLASH_ATTR user_init(void)
{
	uart_init(UART_BAUD_RATE, UART_BAUD_RATE);
	os_timer_setfn(&start_timer, (os_timer_func_t*)run_application, NULL);
	os_timer_arm(&start_timer, 500, 0);
}
B. Blinkee.
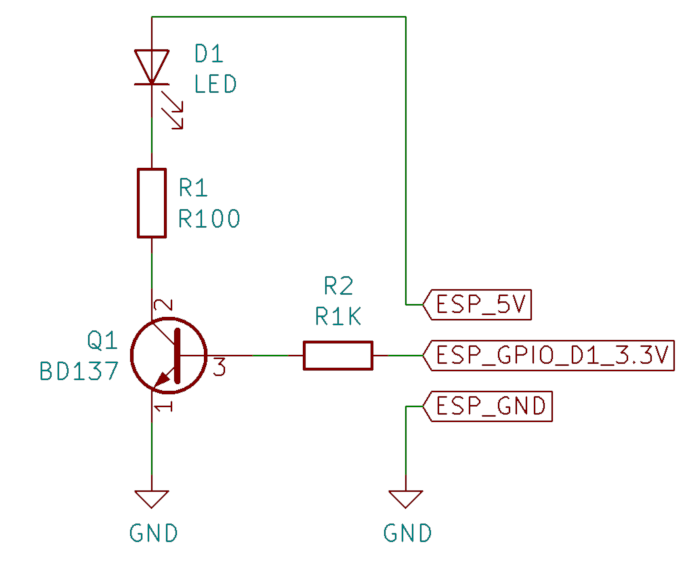
#include "osapi.h"
#include "user_interface.h"
#include "gpio.h"

#define UART_BAUD_RATE 19200

#define SYSTEM_PARTITION_RF_CAL_SZ              0x1000
#define SYSTEM_PARTITION_PHY_DATA_SZ            0x1000
#define SYSTEM_PARTITION_SYSTEM_PARAMETER_SZ    0x3000

#define SYSTEM_SPI_SIZE                         0x400000

#define SYSTEM_PARTITION_RF_CAL_ADDR            SYSTEM_SPI_SIZE - SYSTEM_PARTITION_SYSTEM_PARAMETER_SZ - SYSTEM_PARTITION_PHY_DATA_SZ - SYSTEM_PARTITION_RF_CAL_SZ
#define SYSTEM_PARTITION_PHY_DATA_ADDR          SYSTEM_SPI_SIZE - SYSTEM_PARTITION_SYSTEM_PARAMETER_SZ - SYSTEM_PARTITION_PHY_DATA_SZ
#define SYSTEM_PARTITION_SYSTEM_PARAMETER_ADDR  SYSTEM_SPI_SIZE - SYSTEM_PARTITION_SYSTEM_PARAMETER_SZ

static const uint8 GPIO_PIN_LED = 2;
static os_timer_t start_timer;

static const partition_item_t part_table[] =
{
	{ SYSTEM_PARTITION_RF_CAL,              SYSTEM_PARTITION_RF_CAL_ADDR,           SYSTEM_PARTITION_RF_CAL_SZ              },
	{ SYSTEM_PARTITION_PHY_DATA,            SYSTEM_PARTITION_PHY_DATA_ADDR,         SYSTEM_PARTITION_PHY_DATA_SZ            },
	{ SYSTEM_PARTITION_SYSTEM_PARAMETER,    SYSTEM_PARTITION_SYSTEM_PARAMETER_ADDR, SYSTEM_PARTITION_SYSTEM_PARAMETER_SZ    }
};

void ICACHE_FLASH_ATTR user_pre_init(void)
{
	system_partition_table_regist(part_table, 3, SPI_FLASH_SIZE_MAP);
}

void run_application(void* arg)
{
	if (GPIO_REG_READ(GPIO_OUT_ADDRESS) & (1 << GPIO_PIN_LED))
	{
		gpio_output_set(0, (1 << GPIO_PIN_LED), 0, 0);
	}
	else
	{
		gpio_output_set((1 << GPIO_PIN_LED), 0, 0, 0);
	}
}

void ICACHE_FLASH_ATTR user_init(void)
{
	uart_init(UART_BAUD_RATE, UART_BAUD_RATE);
	gpio_init();
	PIN_FUNC_SELECT(PERIPHS_IO_MUX_GPIO2_U, FUNC_GPIO2);
	gpio_output_set(0, 0, (1 << GPIO_PIN_LED), 0);
	os_timer_setfn(&start_timer, (os_timer_func_t*)run_application, NULL);
	os_timer_arm(&start_timer, 500, 1);
}
C. External LED Console.This sample application demonstrates how external LED can be connected to low-current ESP GPIO output pin and how this LED can be controlled over ESP UART input. Diagram below indicates typical connection schema. You might notice that BD137 NPN transistor is used in my sample. But you can use any NPN transistor here with supported collector-emmiter current more than 50 mA (like 2N2222):
Sample source code:
#include "osapi.h" #include "user_interface.h" #include "gpio.h" #define UART_BAUD_RATE 19200 #define UART_LOCAL_RX_BUFFER_SIZE 1024 #define SYSTEM_PARTITION_RF_CAL_SZ 0x1000 #define SYSTEM_PARTITION_PHY_DATA_SZ 0x1000 #define SYSTEM_PARTITION_SYSTEM_PARAMETER_SZ 0x3000 #define SYSTEM_SPI_SIZE 0x400000 #define SYSTEM_PARTITION_RF_CAL_ADDR SYSTEM_SPI_SIZE - SYSTEM_PARTITION_SYSTEM_PARAMETER_SZ - SYSTEM_PARTITION_PHY_DATA_SZ - SYSTEM_PARTITION_RF_CAL_SZ #define SYSTEM_PARTITION_PHY_DATA_ADDR SYSTEM_SPI_SIZE - SYSTEM_PARTITION_SYSTEM_PARAMETER_SZ - SYSTEM_PARTITION_PHY_DATA_SZ #define SYSTEM_PARTITION_SYSTEM_PARAMETER_ADDR SYSTEM_SPI_SIZE - SYSTEM_PARTITION_SYSTEM_PARAMETER_SZ static const uint16 GPIO_PIN_LED = 2; static const uint16 GPIO_PIN_EXTERNAL_LED = 5; static const uint16 HEARTBEAT_FLASH_DELAY = 10 * 1000; static os_timer_t start_timer; static uint16 idx = 0; static uint8 flash_mode = 0; static uint8 local_rx_buf[UART_LOCAL_RX_BUFFER_SIZE]; static const partition_item_t part_table[] = { { SYSTEM_PARTITION_RF_CAL, SYSTEM_PARTITION_RF_CAL_ADDR, SYSTEM_PARTITION_RF_CAL_SZ }, { SYSTEM_PARTITION_PHY_DATA, SYSTEM_PARTITION_PHY_DATA_ADDR, SYSTEM_PARTITION_PHY_DATA_SZ }, { SYSTEM_PARTITION_SYSTEM_PARAMETER, SYSTEM_PARTITION_SYSTEM_PARAMETER_ADDR, SYSTEM_PARTITION_SYSTEM_PARAMETER_SZ } }; void ICACHE_FLASH_ATTR user_pre_init(void) { system_partition_table_regist(part_table, 3, SPI_FLASH_SIZE_MAP); } void invert_gpio(const int gpio_num) { uint16 pin_mask = 1 << gpio_num; GPIO_OUTPUT_SET(gpio_num, (GPIO_REG_READ(GPIO_OUT_ADDRESS) & pin_mask) == 0); } void process_input_command(const uint8 cmd) { switch(cmd) { case 'a': case 'A': os_printf("\n--> Switching External LED On\n"); GPIO_OUTPUT_SET(GPIO_PIN_EXTERNAL_LED, 1); break; case 'b': case 'B': os_printf("\n--> Switching External LED Off\n"); GPIO_OUTPUT_SET(GPIO_PIN_EXTERNAL_LED, 0); break; case 'c': case 'C': flash_mode = !flash_mode; if (flash_mode) { os_printf("\n--> Setting Flash Mode On\n"); } else { os_printf("\n--> Setting Flash Mode Off\n"); } break; } } void run_application(void* arg) { ++idx; // Build-in LED Heartbeat flashing if (idx % 20 == 0) { GPIO_OUTPUT_SET(GPIO_PIN_LED, 0); os_delay_us(HEARTBEAT_FLASH_DELAY); GPIO_OUTPUT_SET(GPIO_PIN_LED, 1); idx = 0; } // Read input from UART0 uint16 bytes_read = rx_buff_deq(local_rx_buf, UART_LOCAL_RX_BUFFER_SIZE); if (bytes_read) { // Echo input back to user uart0_tx_buffer(local_rx_buf, bytes_read); // Commands Processing uint16 i; for (i = 0U; i < bytes_read; ++i) { process_input_command(local_rx_buf[i]); } } // Flip External LED level if (flash_mode) { if (idx % 4 == 0) { invert_gpio(GPIO_PIN_EXTERNAL_LED); } } } void ICACHE_FLASH_ATTR user_init(void) { uart_init(UART_BAUD_RATE, UART_BAUD_RATE); gpio_init(); PIN_FUNC_SELECT(PERIPHS_IO_MUX_GPIO2_U, FUNC_GPIO2); PIN_FUNC_SELECT(PERIPHS_IO_MUX_GPIO5_U, FUNC_GPIO5); gpio_output_set(0, 0, (1 << GPIO_PIN_LED) | (1 << GPIO_PIN_EXTERNAL_LED), 0); os_timer_setfn(&start_timer, (os_timer_func_t*)run_application, NULL); os_timer_arm(&start_timer, 50, 1); } |